JEM RESTYLING
p1
p2
p3
Work Under Way
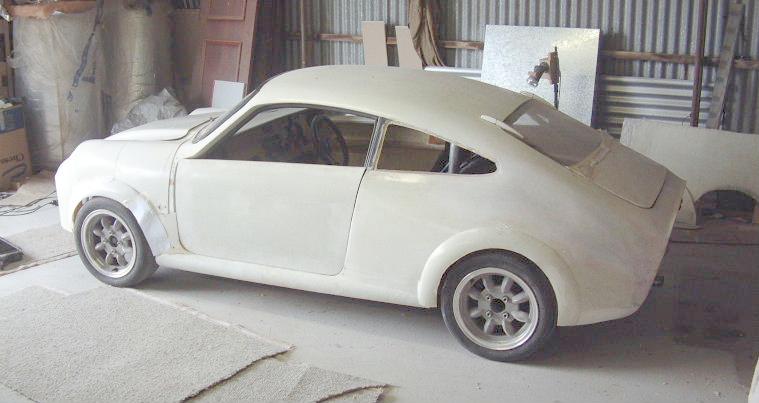
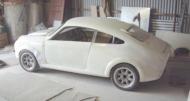
 The first thing to decide was the angle of the new sill line. The aim was to
alter the side elevation massing by increasing the "bodywork to glass-area ratio"
at the rear. (Take notes if you like - there will be a short test later!)
The first thing to decide was the angle of the new sill line. The aim was to
alter the side elevation massing by increasing the "bodywork to glass-area ratio"
at the rear. (Take notes if you like - there will be a short test later!)
I did lots of mocking-up with paper and cardboard until satisfied with the result.
The new rear side windows and door pillar profile were outlined in ply
and the area skinned with flat sheet epoxy fiberglass. The flat sheet was
layed-up on a laminated bench-top surface and removed before it was finally
cured, then draped over the area and glued and pinned down all round the
edges. After all this had fully cured the outer edge was sanded smooth. The
result is a seemingly moulded panel with a smooth finish. The gap between
the skins was later filled with expanding foam to form a strong rigid
composite. The rear hatch had been made several years before, but in keeping
with the overall clean-up I replaced the Mini hinges with purpose-made
internal ones. The rear edge of the hatch window was raised and reshaped to
continue the new side sill line
This also helps to add more apparent mass rearward, keeps the things in
the boot out of sight and reduces heat build-up inside the car.
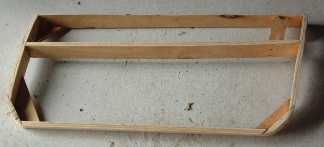
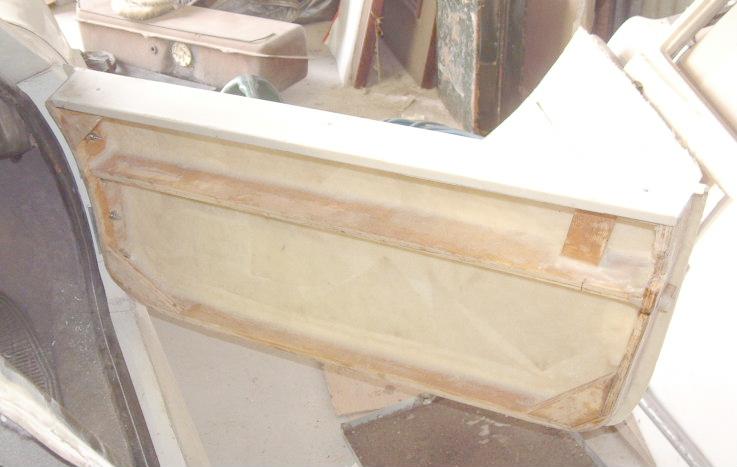
The doors were built with 15mm plywood frames with lots of interesting
shapes and angles which I first made from thick cardboard and transferred to
the ply. The pieces were glued and screwed together using epoxy resin and
glue powder mixed to make a paste that sets as hard as rock. I used
stainless steel hinges and Mini 850 door latches.
When I was happy with the fit of the door in the opening, I skined them
with flat sheet epoxy fiberglass, adding filletes and another layer to the
inside to strengthen everything.
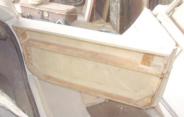 Even without the inner panels they are imposible to twist and close with
a reasuring "thunk".
Even without the inner panels they are imposible to twist and close with
a reasuring "thunk".
I had decided from the start to use removeable door windows that can be
stored in the boot. This is because although I use the car on a regular
basis, the majority of the time the weather here is such that the windows
would be open anyway. I removed the top frames from the original doors and
will fit stainless steel sill members with dowels and tube fittings. The
flat glass side windows will have small openings with sliding covers.
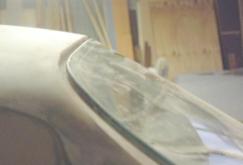
 Some years ago I had destroyed the front of the car in a racing accident,
and using the original moulds I had built a simple flip-front that went all
the way over the original bodywork back to the door hinges. This was removed
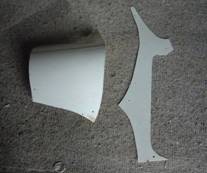
and became the basis of the new flip-bonnet. The picture on the left shows the
scuttle pieces needed to raise and blend the existing windscreen base with
the bonnet. The curved piece was cut off the existing bonnet wing and the
flat piece made in the same way as the door skins. These were glued on to
the existing bodywork and blended into the wiper shaft area at the base of
the screen, up the A pillars and back to the doors.
Some years ago I had destroyed the front of the car in a racing accident,
and using the original moulds I had built a simple flip-front that went all
the way over the original bodywork back to the door hinges. This was removed
and became the basis of the new flip-bonnet. The picture on the left shows the
scuttle pieces needed to raise and blend the existing windscreen base with
the bonnet. The curved piece was cut off the existing bonnet wing and the
flat piece made in the same way as the door skins. These were glued on to
the existing bodywork and blended into the wiper shaft area at the base of
the screen, up the A pillars and back to the doors.
I spent a lot of time getting the front of the door to rotate inside the
fixed scuttle panel without touching it. The geometry is really quite simple
once you work it out. It's all to do with getting the hinge center line
correct.
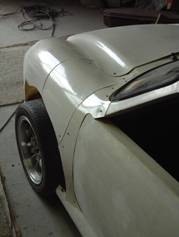
The angle of the top of the wing was set at the same as the new sill to
continue the line through the side elevation. It's actually only a slight
difference from the original line.
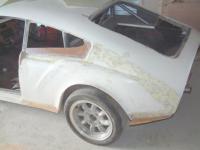
Wheel Arches
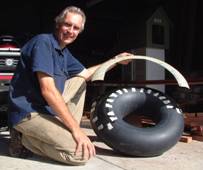 The wheel arch flares were made with epoxy fiberglass, using an inner tube
from a quad bike to make the epoxy female mould.
The wheel arch flares were made with epoxy fiberglass, using an inner tube
from a quad bike to make the epoxy female mould.
First I inflated the tube to the correct size and masked up the
approximate size of the flare. Then painted it with PVA release agent and
when dry I layed-up several layers of epoxy fiberglass. When this was dry
the tube was deflated and the mould release washed off. Presto, one mould
ready to lay-up four new flares.
Choose a tube with little or no markings on it and your finishing job is
that much easier.
They were glued to the new bodywork and the area behind sealed to the
existing inner wheel arch with fiberglass after the gap between the skins
had been filled with expanded foam. Not a job for the faint-hearted!
I also used this mould to make the roll-under panels behind the rear
wheels that blend with the rear light panel. The deepening of this area also
adds to the illusion of having raised the rear end - which I didn't!
Windscreen
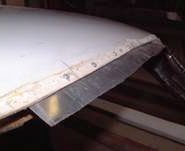
The flushed windscreen was achieved by adding a section of fiberglass to the
opening, forming a new lowered ledge to sit the glass on. I first bolted a
strip of aluminium to the underneath of the opening and then layed-up
several layers of fiberglass onto it and the surrounding bodywork.
 I then wrapped the screen in cling-wrap film and pressed it down onto the wet
fiberglass to make a flat bed of the correct contours. I added a mixture of
fiberglass and filler powder to produce the new required shape level with
the outer face of the screen.
I then wrapped the screen in cling-wrap film and pressed it down onto the wet
fiberglass to make a flat bed of the correct contours. I added a mixture of
fiberglass and filler powder to produce the new required shape level with
the outer face of the screen.
 The screen is later held in place with
double-sided tape designed especially for the job, but aim for 100% touch
all around so the tape has maximum contact area. Mine hasn't budged since I
installed it, nor leaked a drop.
The screen is later held in place with
double-sided tape designed especially for the job, but aim for 100% touch
all around so the tape has maximum contact area. Mine hasn't budged since I
installed it, nor leaked a drop.
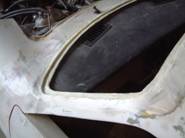
Front End
The new nose section was made in a purpose-made mould and grafted onto the
original flip front, the whole thing being hinged on a new steel frame that
protrudes in front of the radiator. The new wider front opening was moulded
with a rolled edge like the original which gives it a fuller and more
substantial look than simply cutting the hole in the front.
Because the whole bonnet ended up being about 10mm higher than the
original, I was able to dispense with the bump over the engine and only
needed to add a couple of small bulges over the brake pipes and oil filler
cap. I used a Mini hub-cap as a mould....keeping the BMC theme going.

By making the front face vertical I was able to set the radiator upright
rather than slanted forward as it was before, giving better access to the
front of the motor.
The side sills were made by laying up epoxy fiberglass around a 100mm PVC
pipe and then wrapping the lot with cling film till cured - then removing
the tube. After they are fully cured they are then cut lengthwise to produce
a "C" shape that is glued and screwed in place under the doors.
continues...
© 2004 Paul Mitchell, Adelaide, South Australia